Ad Blocker Detected
Our website is made possible by displaying online advertisements to our visitors. Please consider supporting us by disabling your ad blocker.
Looking for a reliable way to repair cracked plastic parts on your car, household items, or hobbies?
Quick summary
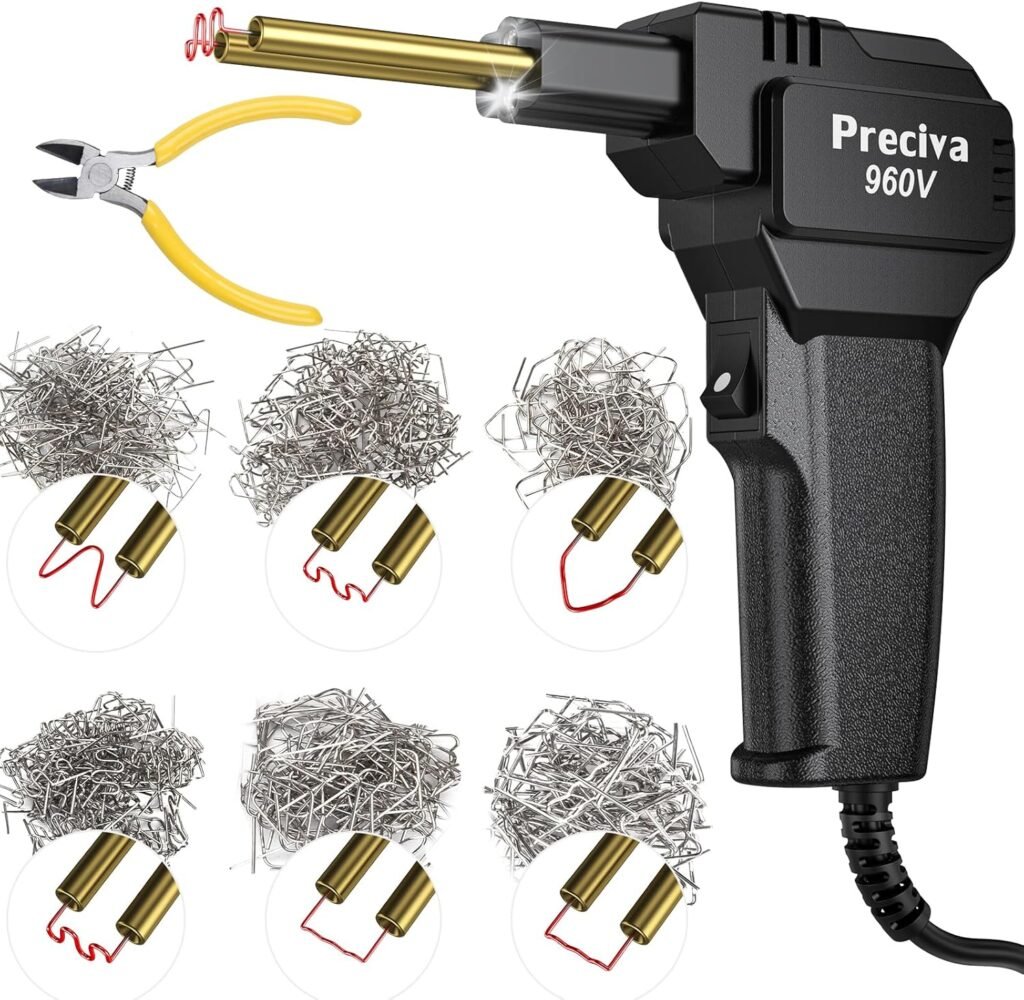
You’ll find the Precision-named product — Plastic Welding Kit, 3s Instant Heating, 4 Shapes/600pcs Hot Staples, Preciva 50W Plastic Repair Kit, Brass Heating Core with Double Led Light, for Welding Broken Plastics, Car Bumper, etc — aims to make plastic repairs fast, strong, and accessible. It heats quickly, includes a variety of hot staples for different crack types, and comes with a brass heating holder and two LED lights to help you work in tighter, darker spots.
What’s in the box
You’ll immediately see that the kit is comprehensive and geared toward common repair tasks you’re likely to encounter. Everything is arranged so you can get started without shopping for extra consumables.
| Item | Quantity / Details |
|---|---|
| Welding gun / machine | 1 unit (50W heating tool with brass heating core) |
| Pliers | 1 pair (for inserting and removing hot staples) |
| Flat staples | 0.8 mm & 0.6 mm — 100 pcs each |
| Wavy staples | 0.8 mm & 0.6 mm — 100 pcs each |
| V staples | 0.8 mm — 100 pcs |
| M staples | 0.6 mm — 100 pcs |
| Total staples | 600 pcs (various shapes and sizes) |
| Built-in lights | 2 LEDs on the tool body |
| Heating element | Nickel-chrome wire, brass holder with copper tube clamp |
Key features at a glance
You’ll appreciate that the kit targets speed, variety, and safety in one package. The main highlights are the quick heating time, four staple shapes for different crack geometries, a brass heating core, and ergonomic handling with lights for visibility.
3s Instant Heating (Performance)
You’ll get near-instant heat thanks to a nickel-chrome heating wire and a brass heating core that stabilizes temperature. The manufacturer claims up to 600°C max working temperature and that a hot stapler will melt plastic in about 3 seconds once inserted — which translates into faster bonding than cold adhesives.
Four staple shapes and when to use them (Precision)
You’ll find four staple types so you can match the repair method to the shape of the crack. Using the correct staple shape improves joint strength and reduces the chance of cosmetic problems.
| Staple shape | Best use | Why it helps |
|---|---|---|
| V staples | Inner corner cracks | The V profile sits into a corner and holds the two sides together securely |
| M staples | Outer corner cracks | The M profile grips the outside edge and resists flex |
| Wavy staples | Large or curved cracks | Wave profile spreads load and conforms to curves |
| Flat head staples | Fine, straight cracks | Flat heads are low-profile and give a clean finish |
Brass heating core and pure copper tube clamp (Durability & Safety)
You’ll notice a brass heating core that transfers heat evenly and a pure copper tube clamp that prevents the tool body from becoming dangerously hot during long use. That combination makes the tool safer and more durable during continuous work sessions.
Double LED lights and ergonomics (Visibility & Comfort)
You’ll benefit from two LED lights built into the tool body, which broaden illumination for dim repair areas. The ergonomically shaped handle is designed to reduce hand fatigue, letting you work longer with better control.
Specifications (clear breakdown)
You’ll want quick access to the essential technical specs so you can compare with alternatives or confirm it meets your needs.
| Spec | Detail |
|---|---|
| Power | 50 W |
| Heating element | Nickel-chrome wire |
| Max working temperature | Up to 600°C (manufacturer claim) |
| Heating time | Hot staples melt plastic in ~3 seconds when engaged |
| Staples included | 600 pcs total, mix of flat, wavy, V, and M shapes |
| Staple sizes | 0.8 mm and 0.6 mm varieties per shape (see box list) |
| Lighting | 2x LED lights on tool body |
| Suitable plastics | Most thermoplastics (except plastics containing fiberglass) |
| Accessories | Pliers for staple insertion/removal |
How the kit performs on common repairs
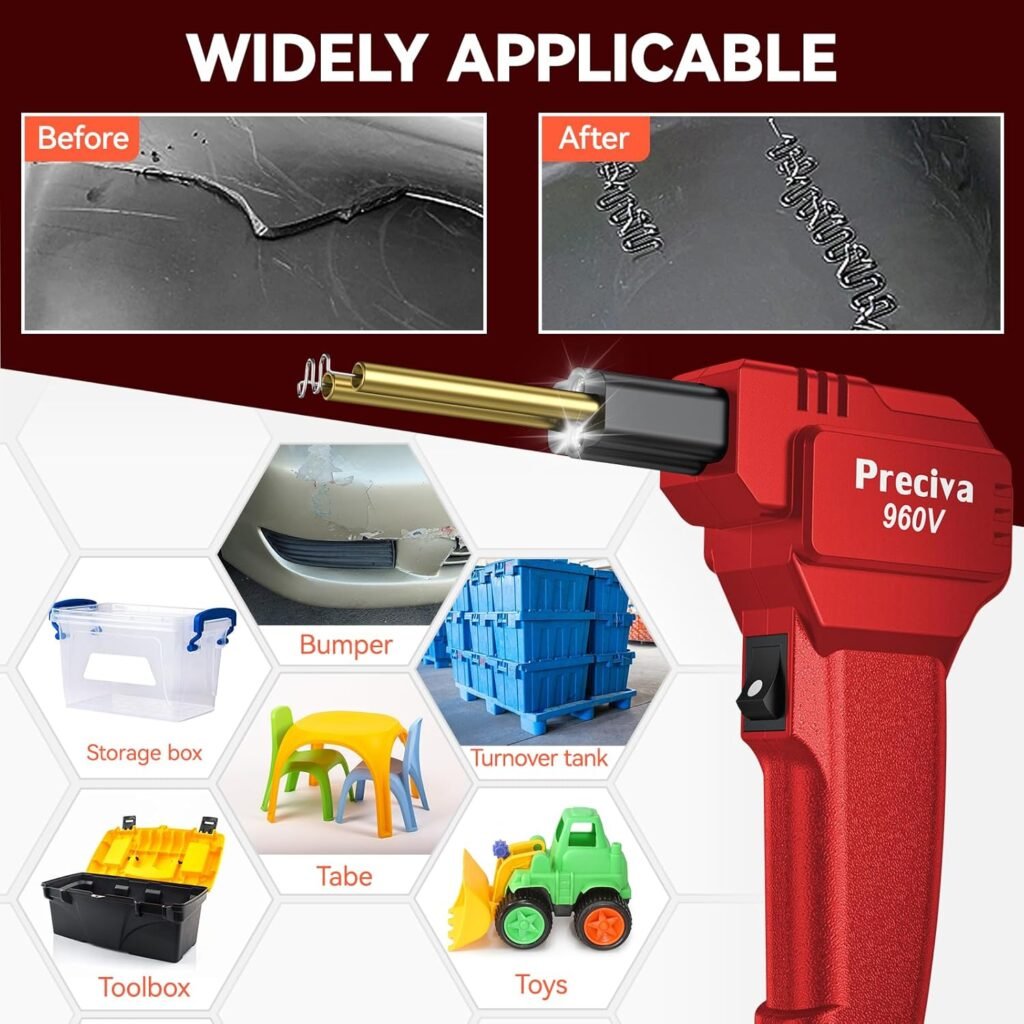
You’ll be fixing many everyday bits of plastic with this kit, from bumpers to housings. The 3-second heating and staple variety let you tailor your approach and usually yield stronger joints than adhesives.
Car bumper repairs
You’ll typically use M or wavy staples on bumpers because they often have curvature or take impact. You’ll want to work from the back side where possible, anchoring the crack with staples and then filling over with plastic filler (if needed) for structural strength.
Household items and toys
You’ll find flat or V staples useful for smaller items like plastic housings, toys, or lawn tool handles. You’ll be doing quick spot repairs that restore function and often look better than glued joints.
Appliances and electronics housings
You’ll be cautious here: you can repair many plastic housings, but you’ll avoid areas near electrical components unless you disconnect power and take proper ESD and heat precautions. You’ll use small flat staples for discreet, low-profile fixes.
Step-by-step use guide
You’ll get the best results when you follow a few straightforward steps — preparation, heating, anchoring, and finishing.
- Prepare the work area and safety gear: clear the part, wear heat-resistant gloves and eye protection, and work in a ventilated area. You’ll avoid inhaling fumes and protect your hands and eyes.
- Heat the tool: plug in the welding gun and allow the brass holder and nickel-chrome element to reach operating temperature (the kit warms staples in about 3 seconds when inserted).
- Insert a staple in the holder with the pliers: you’ll use the pliers to position the staple without touching the hot metal.
- Apply the staple: press the heated staple into the crack from the back side (if possible), melt the plastic so the staple seats, then withdraw the tool or staple insertion tip carefully.
- Repeat and stitch: you’ll place a row of staples every few millimeters along the crack for strength, adjusting staple shapes for corners and curves.
- Trim and finish: once the staples are set, you’ll remove excess heads and grind or sand the surface before applying any filler or paint.
Safety considerations
You’ll be dealing with high temperatures and molten plastic, so following safety precautions reduces risk and improves outcomes.
Heat and burn prevention
You’ll avoid direct contact with the brass holder, staples, and melted plastic. Use heat-resistant gloves and keep the welding gun in a safe holder when not in use.
Ventilation and fumes
You’ll always work in well-ventilated areas because heated plastics can release fumes that you don’t want to breathe. If you’re doing many repairs in a short time, consider a mask rated for organic vapors.
Electrical safety
You’ll inspect power cables before use and unplug the tool when replacing staples or performing maintenance. Avoid using the tool in wet conditions.
Maintenance and care
You’ll keep the tool working reliably with some routine care, which prolongs life and performance.
- Clean the brass holder and tip regularly to remove melted plastic buildup; warming the tip slightly and wiping with a brass brush (while the tool is unplugged and cooled) helps.
- Store staples in a dry place to avoid corrosion.
- Inspect the power cord and LED lights for damage before use.
- Avoid using the tool on plastics with fiberglass content, as the abrasive fibers can damage the heating element and produce hazardous dust.
Troubleshooting common issues
You’ll likely hit a few snags if you’re new to plastic welding; here’s how to handle them.
- Tool not heating: check power connection and outlet; test the unit on a different outlet; inspect the internal fuse or wiring if comfortable.
- Staples not melting plastic: confirm the tool reached temperature, use the proper staple size and shape, and ensure the plastic type is thermoplastic (not cross-linked or fiberglass-filled).
- Poor staple adhesion: reduce movement while staples cool, or add a light layer of compatible plastic filler to secure the joint after welding.
Pros (what you’ll like)
You’ll find several practical advantages that make this kit appealing for DIYers and semi-professional work.
- Fast heating time: you’ll get up to temperature quickly, speeding repairs.
- Variety of staples: you’ll have the right staple for corners, curves, and fine cracks.
- Good value: 600 staples and essential accessories mean you won’t run out fast.
- Built-in lights: you’ll have better visibility in tight or dark spaces.
- Ergonomic handle: you’ll be less fatigued during longer jobs.
Cons (what to be aware of)
You’ll also want to weigh some limitations before buying.
- Not for fiberglass-reinforced plastics: you’ll need a different method for fiberglass-filled components.
- Learning curve: you’ll practice to get neat cosmetic finishes, especially on visible surfaces.
- Heat caution: you’ll need gloves, ventilation, and patience for cooler handling and finishing.
- No explicit temperature control: you’ll rely on the tool’s fixed performance rather than adjustable settings.
Comparison with alternatives
You’ll consider other repair methods depending on the job. Here’s how this kit stacks up.
Glue and adhesives
You’ll often find adhesives easier for small cosmetic fixes, but they rarely match the mechanical strength that welded staples provide. Adhesives may be less heat-resilient and can fail under stress that a welded staple repair can withstand.
Soldering irons or plastic welders with rods
You’ll see tools that melt plastic rods to fuse parts — those can produce a smoother finish for filling but may be slower and require more consumables. The hot-staple method gives strong mechanical anchoring quickly.
Professional repairs (shop repairs)
You’ll get a high-quality finish and possibly paint-matched repairs at a shop, but at a significantly higher cost. This kit allows you to perform many structural repairs yourself and only use a shop for final cosmetics if needed.
Best practices for strong, clean results
You’ll have better outcomes when you follow a few best practices tailored to the kit’s design.
- Work from the inside or back side when possible to hide staples.
- Place staples perpendicular to the crack and space them evenly.
- Allow staples to cool before bending or stressing the joint.
- Use filler and sanding after staple anchoring for a smooth finish.
- Test on scrap plastic first to get comfortable with temperature and timing.
Repair examples with step-by-step details
You’ll get more confidence by applying methods to specific projects. Here are two common scenarios.
Car bumper crack — step-by-step
You’ll likely do this on a bumper removed or partially removed for access.
- Clean the area with isopropyl alcohol and remove debris.
- Position the bumper where you can access the inner side of the crack.
- Heat the tool and insert a staple with pliers.
- From the back side, insert staples every 5–15 mm depending on crack size, using M or wavy staples on curves.
- After staples cool, fill over the top with compatible plastic filler or welding rod, then sand and paint if desired.
You’ll find the welded staples restore structural integrity so the bumper holds up under normal stress.
Plastic toy or housing — step-by-step
You’ll choose flat staples for small, thin plastics.
- Disassemble the toy/housing if possible to isolate the crack.
- Clean and align the parts so the crack edges meet.
- Heat the tool and insert a flat staple.
- Place staples along the seam, keeping spacing tight for thin plastics.
- Trim any protruding heads and sand lightly; reassemble once finished.
You’ll restore usability quickly and end up with a durable repair that often outlasts adhesive fixes.
Who should buy this kit?
You’ll want this kit if you’re a DIYer, automotive enthusiast, maker, or hobbyist who frequently fixes plastic parts. You’ll benefit most if you want structural repairs (not just cosmetic) and prefer an affordable kit with varied staples and decent illumination.
Who should pass?
You’ll consider other options if you only need occasional glue-based fixes, lack ventilation or safety equipment, or primarily repair fiberglass-reinforced plastics. Professionals who require adjustable temperature control or industrial tools might also look at higher-end welding systems.
Price-to-value assessment
You’ll find that the combination of the 50W heating tool, 600 staples of four useful shapes, and included pliers makes this kit cost-effective. You’ll replace fewer parts and spend less on shop labor when you can weld and stitch cracks yourself.
Accessories and extras you might want
You’ll improve results with a few additional items that aren’t typically included.
- Heat-resistant gloves and safety glasses for protection.
- Plastic filler rods or putty for smoothing finished repairs.
- Small grinder or fine sandpaper for trimming and finishing.
- A small vise or clamps to hold parts in alignment during welding.
- A respirator if you do many repairs in an enclosed space.
Environmental and material notes
You’ll want to ensure you’re working on thermoplastics: the kit works well with many common plastics but is not suitable for plastics containing fiberglass. You’ll also take proper precautions to dispose of plastic waste responsibly and manage fumes.
Troubleshooting specific situations
You’ll occasionally face issues that require targeted fixes. Here are a few scenarios and quick fixes.
- Crack reopens after stress: you’ll add more staples or use a larger staple size; consider applying an inner patch of plastic using a welding rod if strength is still insufficient.
- Cosmetic blemishes after welding: you’ll sand and apply plastic filler or putty, then prime and paint for a smooth surface.
- Tool gets too hot: you’ll allow intermittent cooling breaks and check the copper clamp and brass holder for residue or damage.
Longevity and reliability
You’ll get durable results if you use the right staple type, place staples properly, and finish the joint. Structural repairs done correctly can last as long as the original part under normal stress conditions.
FAQ
You’ll likely have these questions — here are concise answers.
- Is the kit safe to use on all plastics? You’ll avoid plastics containing fiberglass and ensure the plastic is thermoplastic. For unknown plastics, test on a scrap piece first.
- How long do staples take to cool? You’ll typically wait a few seconds to a minute depending on ambient temperature before handling the area; larger staples may take longer.
- Can you paint over the repair? You’ll sand and use a plastic-compatible primer before painting for best adhesion.
- Are replacement staples easy to find? You’ll find similar hot staples from various suppliers; match shape and diameter (0.6 mm or 0.8 mm) for compatibility.
- Do the LEDs run on the same power source as the heater? You’ll power the LEDs from the tool’s electronics; they’re intended for visibility and should work whenever the tool is on.
Final verdict
You’ll find the Plastic Welding Kit, 3s Instant Heating, 4 Shapes/600pcs Hot Staples, Preciva 50W Plastic Repair Kit, Brass Heating Core with Double Led Light, for Welding Broken Plastics, Car Bumper, etc a strong value for anyone who wants fast, structural plastic repairs without expensive shop trips. You’ll get quick heating, a useful variety of staples, and built-in lighting that helps you work in tight or dim places. With basic safety gear and a little practice, you’ll be able to restore many plastic parts to solid, usable condition.
Disclosure: As an Amazon Associate, I earn from qualifying purchases.


